


Windows 10 / 11 Find the startup folder & Window Optimization Tips-
Windows 10 ,11 already offers the ability to activate or disable startup applications using the Task Manager or Windows Settings, but it does not offer the capability to include a custom app.
However, Windows has a hidden Startup Folder where you may put any application or programme you want to execute when the operating system starts up.
Here’s how to add an app to the Windows Startup Folder.
How to Locate the Startup Folder in Windows 10 and Windows 11
Using the Run dialogue box is one method for locating the Startup Folder on your Windows computer.
Open the Run dialogue box by pressing Windows Key + R, enter the following command, and then click the OK or Enter button.
shell:startup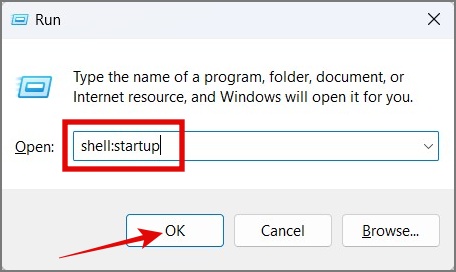
I’m done now. Your Windows 10 or 11 computer’s Startup Folder will be opened immediately as a result.
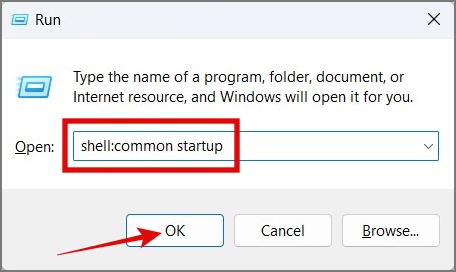
What if you wish to access the Startup Folder for all users? The aforementioned command only works for the current user. Instead, use the following string:
| shell:common startup |
How to Create a Startup Folder for Apps and Programmes
Here’s how to add your preferred software or programme to the Startup Folder now that you know how to get there.
1. Locate the application you wish to add to the Startup Folder by typing its name into the Windows Search box.
2. Right-click on it and select Open file location.
3. Copy the app’s shortcut and paste it into the Startup Folder.
All there is to it is that. The application will now always open immediately when your computer turns on.
Read More –
How to Prevent and Fix Linux Privilege Escalation 2023 |
Managing Your Startup Apps: Some Tips
1. To prevent conflicts, check to see if any apps are already mentioned in the Startup Apps section before adding them to the Startup Folder.
Go to Settings (Windows Key + I) > Apps > Startup to confirm that.
2. Only add apps to the Startup Folder that you really want to run automatically upon your PC startup.
3. Don’t add too many apps to the Startup Folder as this might impact your computer’s boot time.
4. Use the Startup Folder only if the app isn’t listed under Startup Apps.
Read More –
Fix the “VCRUNTIME140 dll Is Missing” Error on Windows 10 |
Where is the Windows 10/11 startup folder located?
In Windows 10/11, the Startup Folder can be found in two separate locations:
Current user should:
| C:\Users\[username]\AppData\Roaming\Microsoft\Windows\Start Menu\Programs\Startu |
Note: In case the AppData folder is hidden, make sure hidden items are enabled in File Explorer.
All users should:
Programmes can be found under C:ProgramDataMicrosoftWindowsStart Menu.Launching Windows’ Startup Folder
A useful feature of Windows 10 and 11 is Startup Folder.
It saves you time and energy by starting apps automatically when your computer turns on.
We wished Microsoft had made this folder directly accessible. But there is a quick fix, and we hope you’ll find it useful, to locate the Startup Folder on Windows 10 and 11.
Before you close the tab, you may also consider reading how to force close an app or game on Windows PC.
How to Optimize Windows 10/11 for Gaming
1. Upgrade to SSD
Quick Note: If your machine already has an SSD installed, skip this step.
Upgrade to SSD if your computer or laptop still uses a hard drive. It’s a one-stop shop for improving your gaming abilities.
Personally, I experienced a significant improvement in gaming performance when I switched from my previous gaming laptop with an HDD to a new gaming laptop outfitted with an SSD.
2. Enable Game Mode
Now that you’ve already got an SSD, the next step would be to enable the Game Mode on your Windows device.
This will prevent Windows from performing any system-level update in the background. Furthermore, it prioritizes your game and gives you access to all the system resources, especially CPU and GPU.
To turn the Game Mode on your Windows 11 or 10, Navigate to Windows Settings (Windows Key + I) > Gaming > Game Mode > Enable Game Mode.
3. Adjust Power Settings
Another step you may do is to switch your power setting to performance mode to boost your game performance.
Your PC’s performance will be slightly improved by this. It’s important to note that this setting could somewhat reduce the battery life of your laptop.
As a result, we advise turning on this mode only before starting a game.
To switch to performance mode, Windows 11 users can open the Settings App, navigate to Power & battery, and select the Best performance option under Power mode.
Users of Windows 10 can easily drag the slider to the right (Best Performance) by clicking on the Battery icon in the Taskbar.
4. Update Your Graphics Card Driver
Your graphics driver can be at blame if your PC stutters when you’re playing a game. Because of this, it is advised to maintain your drivers up to date in order to address any problems that can reduce your gaming performance.
Simply press the Windows Key + X hotkey and choose the Device Manager to update a driver.
After that, choose your graphics card with a right-click and select Update Driver.
By visiting the manufacturer’s website and downloading the most recent graphics card driver, you can easily upgrade the graphics card. In this market, Nvidia and AMD are two of the top companies.
Download the graphics driver for AMD or Nvidia.
5. Lower the Game’s Graphics Settings
If your game begins to lag, you may not have a graphics card powerful enough to run it, or you may be playing a demanding game on a low-end system.
The best way to improve gameplay is to lower the game resolution and turn off a few graphics-intensive options.
You might have a more seamless gaming experience if you do this.
6. Disable Nagle’s Algorithm on Windows
By combining the packets, Nagle’s tool, a network optimisation tool, can increase the effectiveness of your internet connection.
When playing online multiplayer games, this could, however, also cause latency problems.
Follow the instructions below to fix the frame drop or latency problem if you’re having it too while playing:
1. Press Windows Key + S to open the Windows Search and look for Command Prompt or Windows Powershell.
2. Open any of them and type “ipconfig” and hit Enter key.
3. Next, note down the IPv4 Address.
Note: Search for the IPv4 address to which you are currently connected, such as through Wi-Fi or Ethernet.
4. After that, again use the Windows Key + S hotkey and this time look for Registry Editor.
5. Open it and copy & paste the following path into your address bar:
| HKEY_LOCAL_MACHINE\SYSTEM\CurrentControlSet\Services\Tcpip\Parameters\Interfaces |
6. Now under the Interfaces folder, carefully examine each folder individually and look for DhcpIPAddress that matches your IPv4 Address.
7. Once you find out the matching folder, right-click on the folder (left pane) > click New > Select DWORD (32-bit) Value.
8. Name the file “TcpAckFrequency”.
9. Repeat Step 7 and this time name it “TCPNoDelay”.
10. After that, double-click on each file and change the “Value data” to 1.
I’m done now. The Nagle algorithm will be disabled if you restart your computer. You can return to your default settings if you encounter any issues.
7. Switch to Faster DNS
DNS may also be the cause of your decreased game performance, particularly while playing online.
Although many internet service providers (ISPs) have their own DNS servers, these servers frequently aren’t trustworthy.
So it’s preferable to switch to DNS services from reputable and secure companies like Google and Cloudflare.
To change the DNS server address, simply navigate to Networks & internet > select Wi-Fi or Ethernet connection (whichever you’re connected to) > Hardware properties > Edit DNS server assignment > select Manual > Enable IPv4 > Enter DNS IP Address > Save.
8. Use a Dedicated Graphics Card
It would be reasonable to presume that while gaming, your Windows computer may be switching from using the dedicated graphics card to the integrated graphics card.
This issue has existed before and is simple to resolve.
You can read our comprehensive guide on how to make a computer game use a dedicated graphics card.
9. Stop background-running applications
If there are lots of unnecessary apps running in the background, it’s no surprise that your PC starts to lag when playing games.
To fix this issue, disable any apps from running in the background that are affecting your computer’s performance. Here’s how:
Windows 10: Navigate to Settings > Privacy > Background Apps. Now toggle off the apps that you no longer need.
Windows 11: Go to Settings > Apps > Installed Apps > Select Apps > Click meatball menu (3-dot icon) > Advanced options > Let this app run in the background > Select Never.
Alternatively, you can also use the Task Manager (Ctrl + Shift + Esc) to disable apps from running at the startup.
10. Stop Steam from updating games automatically in the background.
While there isn’t a way to totally disable Steam’s auto-update feature, you can at least stop it from doing so in the background.
By doing this, you may prevent Steam from using up system resources while you play games, which will make your PC gaming experience smoother.
Simply go to the game’s Properties, jump to the Updates section, and select the options – Only update this game when I launch it and pause background downloads while I’m playing.
11. Increase RAM Capacity
Low RAM availability could be an additional factor. It’s time to seriously think about upgrading your RAM if your computer routinely experiences memory issues or operates consistently at the limit.
If not, your PC will continue to perform poorly when playing games, especially those that demand a lot of resources.
12. Install the Latest Version of DirectX
Microsoft has significantly enhanced game performance with each new DirectX release.
Ray Tracing, Variable Rate Shading, Mesh Shading, and other features are available with the most recent version of DirectX 12, among others.
This can significantly improve how you play video games.
You may already have the latest version of DirectX installed on your computer. However, if you want to manually check the version, press Windows Key + R to open the Run program, then type “dxdiag” (without quotes) and hit the Enter key.
This will open the DirectX Diagnostic Tool. From there, you can check your DirectX version.
If it is an older version, you can look for updates by navigating to the Windows Update screen.
13. Upgrade Your Graphics Card
By upgrading your graphics card, you may quickly improve your Windows 11 or 10 PC’s gaming performance.
By doing this, you may get rid of problems like screen tearing, lag, frame drops, and more, making your gaming experience smoother and more pleasurable.
Of course, investing in a high-quality graphics card may be more expensive, and system compatibility is another consideration.
However, the improvement in your game performance you’ll see will make the cost worthwhile.
Please add more tips in comments box…


